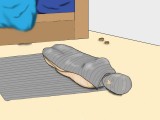
 There are several ways of mummifying yourself. The one described in the pictures below looks seems quite self-explaining and easy to do, but … wait a bit. Let’s have a closer look at it.
What are you going to wear?
This is a very important question. Sweat makes the tape glue weaker (unless it’s a water-proof sticky tape) and the tape loses the ability to stick. This feature can be used to escape from the cocoon. I would not recommend to be naked even if you are totally epilated – the tape and the glue irritate the skin and may even damage it (think of you sensitive areas).
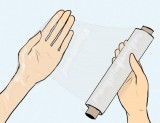 Pantyhose encasement is a very good candidate, since nylon will protect your skin, allow it to breath and does not prevent the sweat from loosening the glue.
If you want to make your bondage more strict, more restrictive with less chances to escape – apply thin plastic film directly to your skin. In other words: mummify yourself with saran wrap first 😉 Saran wrap will perfectly stick to both your skin and sticky tape and will not let your sweat destroy the cocoon.
If the cocoon is made of several layers of strong waterproof montage sticky tape, using your nails to scratch your way through might not succeed. In other words – most likely you will stuck.
Any additional restraints?
Sure, why not? Rope harness (e.g. karada) is always welcome But think about your arms. If they are tightly bound behind your back (cinch noose + wrist loop), will you be able to make a hole in the tape cocoon to get to the knife?
Tape hood
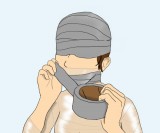 Same precautions as in the “recommended clothes” plus one. We have a nasty dichotomy here. Glue does not make any good if the tape is applied directly to skin, but at least the hood will stay more or less in place. If you have an inner layer (a pantyhose hood or saran wrap), make more space for air holes, since you have to take into account possible sliding of the whole construction.
And do not make it too tight. When you unroll the tape you apply a significant force, and all that force goes into wrapping. You might not notice that during the wrapping, but when you are done and relaxed, suddenly all that accumulated force of the elastic tape might crush your ears, forehead and nose. So, be aware.
Blindfolding will make aiming and precise rolling much more difficult, but you may apply the last piece of tape at a later phase.
Tape sheet
The most difficult and time consuming part of this method. The size of the sheet, the thickness, the amount of layers, the tape overlap depend on the available space, time, patience and you plan (and ability) to break free. A floor not covered with carpet is recommended. Use small pieces of tape to “nail” the sheet to the floor at several places so it does not skew or slide away when you roll into it.
Aiming and placing yourself on the sheet
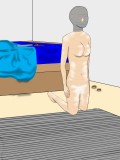 Ideally, To correctly place yourself on the sheet, you would need all your limbs and vision. And correct measurements. For example, you may label the spots where your knees should be with coloured tape. It’s something like playing twister where you have to suspend yourself in mid-air and keep balance on two-three points while slowly trying to reach the third or fourth 😉
Since you can’t undo your wrong movements without disturbing or even ruining your clothes or the sheet, do that in stages and keep your weight on three points (think of rock climbing). First your knees. Then, if the sheet should cover your whole length, the toes.
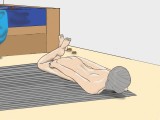 Can you do push-ups with only your left arm? This is what you need to be able to do. Carefully lower yourself onto the tape perpendicular to the tape layers. Do not touch the tape with your hands yet, only your chest and lower body.
Now this is the time to apply gags (if not done yet), blindfolds, to tie your wrists together or complete the hogtie (like on the picture – try before if you can roll or move at all in this position. It’s very difficult!) Glue the left side of the sheet to your left side. Note the direction to roll to and … move to the point of no return.
Rolling
 This is where everything might and usually go wrong if you are blindfolded. Shoulders are wider than ankles. To simplify, imagine that the body (unless the belly is significantly bigger 😉 is cone shaped. If you try to tightly wrap your ankles, your head will move in a circle: the center is your toes, your body is the radius, your head “draws” a circle. But the sheet is rectangular. See what happens? You risk to wrap your head in the sheet.
It happened with me (see Breath control art, plastic bags or thin transparent film. Part V Kids, self-bondage and asphyxia), it happened with Anne (see Self mummification + warning with video).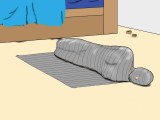
Solutions? Several.
1. One of them is shown on the pictures. Hogtie increases the circumference of the low part of your body.
2. Another one is not to apply the blindfolds until you are completely mummified. You can leave a piece of tape on a sponge at “the end of the road”. Try not to close the “air gates” shut.
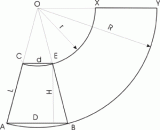 3. Make the sheet in the shape of the lateral surface of a cone. What brings us back to the “Tape sheet” section.
While that would be the ideal solution, it will require some homework to be done (you have to mark and measure the track your shoulder make during rolling) and some tapework craftsmanship 😉
I would advice to make a reusable paper or plastic (from garbage bags) template and test it by rolling into it with your eyes closed.
Escape
I’ve read a real story where the guy had to call for help because the cocoon was so tight that his breathing was restricted, he could not get free and had to call for help. It was extremely embarrassing, but at least he’s still alive to tell the story. So never overestimate your abilities.
The usual escape is to use you fingers to break through the layers, make a hole, than grab a knife and cut through the rest of the shell. You can also take a knife “with you”, but please don’t lose it inside the cocoon and do not cut yourself.
If you know other ways (especially with time release), please let us know.
I tried this technique today exactly as shown in the illustrations, except for the mask, and that I put my arms in a Japanese box style behind my back instead of resting them on the sides.
What went well: The duct tape was really sticky and covered most areas really well and tightly.
What didn’t go well: Because of the legs and arms positioning, it was really, really difficult to roll around. I had to compromise my arms positioning to roll around, and this further contributed to the tape being not as tight as I hoped.
Also, I could not even position my legs and feet as shown in the pictures. As a result, they formed a large tent behind my thighs, and the tape didn’t cover my legs.
Also, I underestimated the amount of tape required, by about 10 cm. I ran out of tape length before I had encased myself from all sides. As such, it was much easier to escape than I had intended. Nevertheless, it took about an hour to make the mattress of duct tape, from 28-or-so strips of about 110-120 cm length. Now the room is heavily scented by duct tape…
Yes, I would say that 110-120 is definitely not enough, though it takes a while to make that sticky carpet.
“Joyl27 ” wrote:
Did you make a rectangle “mattress” or a “cone surface” one (last picture)?
I made a rectangle matress.
Ah, OK, hence it did not “fit”.
Use ice cubs as a time release with non water proof duck tape
Instead of trying to roll yourself all at once, you can wrap and torso circularly. Then you apply panels to your upper chest, upper back, and over the top of you shoulders. Finally you roll onto some sheets to pin your arms at your side.
You can optionally leave your hands exposed when applying the sheets to your arms last. You still feel very stuck, but when the time comes you can easily grasp some scissors to free yourself.
Surely you could freeze water around a blade which you then secure a safe distance away to cut the tape when done?
Two words, Hair dryer. I Tried this on one arm to see if it works. It did, but the tape griped my forearm hard due to struggling. It hurt to much to pull off. So I used a hair dryer to melt the glue and remove the hardest part.
Tips – Try to keep your fingers loose from the tape. Sweat will loosen up the glue and keep it from sticking again. It may take ~30-40 min to see results. Don’t push outward in an attempt to rip/stretch the tape. It will only make it worse. Instead use loosened figures to pinch and tear it.