17 Nov 2010, 01:17
Here's an interesting 'how to' article from UK crossplayer (crossdressing cosplayer) 'Ranma 1-2' in which he shows how he made the lycra thighboots for one of his Catwoman costumes.
Excellent stuff for those on a tight budget, here are his boots worn with the catsuit (the mask is still still a work-in-progress here)...

Quote:Walkthrough: Boot Covers
Article by Stephen Pryce (Ranma1-2) posted Friday 2nd July 2010
As some people have asked me, here is a detailed walkthrough for how I made the thigh-high boot toppings on my Catwoman costume.
Materials used
* A donor pair of shoes
* Stretch cotton lycra fabric
* Evostick Impact contact adhesive
* Safety pins
* Dress pins
1. Start of course by selecting a pair of donor shoes. Here are the ones I used.
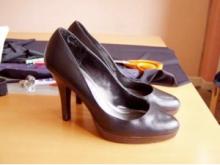
2. Put your donor shoes on. I also put some sellotape temporarily around the stilletto heel tips to protect the fabric during the process because my heels had rough edges where the hard plastic had worn.
3. Use 4 way stretch lycra fabric if you can get it. If you can't.. make sure you use the fabric with its streatchiness going width ways around the shape of your leg.
4. Start pinning down the rear seam using safety pins. Stretch the material just enough to look smooth and wrinkle free on your leg. Continue pinning all the way down the back of the leg and shoe heel, then pull the fabric around the foot and pin it up the inside of the heel and under the arch too. Don't pin under the sole, leave that open for now.
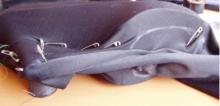
5. Ease your foot out of the shoe and remove your leg out of the pinned boot topping. The shoe will be left behind inside the topping, partially trapped at the heel.
- LEAVE the topping still inside out, until step 15 -
6. Now with the topping free of your body it is possible to turn the shoe out through the bottom hole which is still left in the sole (thats why you don't pin the sole). The stilleto heel will slide out easily by rolling the whole shoe forward.
7. With the shoe now removed, lay the topping fabric flat and draw a chalk seam line accuratey following the rear seam line made by the safety pins.
8. Tack stitch along this line, removing the safety pins as you go.
9. Now we are ready for a test fit. Replace the shoe back through the bottom hole by threading the stilletto heel around and into its position first and then pushing the rest of the shoe up. This should simply be the reverse of how you removed the shoe.
10. Try the boot toppings on again to make sure they fit snugly everywhere. Make any adjustments if neccesary. Green tack stitching can be seen in pic below.
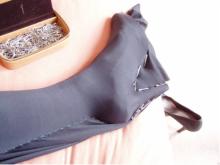
Note: Depending how much stretch your lycra has the problem area will be the ankle, but take it gently and it should have enough give for your foot to ease around the narrowest part and into the shoe.
11. Test fitting over, Remove boot topping off your leg as before.
12. Remove shoe from topping as before.
13. Now we are sure of the correct fit we can make the main back seam permanent. If you wish to leave the tack stitching in then just go over it with the sewing machine, but for neatness I used dress pins to pin along both sides of the tacked seam line so I could then unpick the tack stitching and properly run it through the sewing machine.

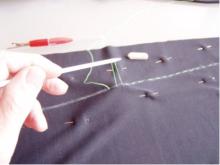
14. With the main rear seam now complete trim off the excess leaving just a small seam allowance.
- Now it is Time to turn the topping the right way around -
15. With the topping the right way round and the good side now on the outside, replace the shoe through the bottom hole as you did before, sliding the heel in first and rolling the shoe into position.
16. Pull the fabric over the sole for a dry run to make sure everything is still looking good to go to the final glueing stage.
17. Before glueing make sure to clean off any polish from the surface of the shoe where glue is to be applied, white spirit should remove it effectively.
18. Using Evostick Impact contact adhesive apply glue sparingly onto a short length (eg 5cm) of the side of the shoes sole, streatch the fabric over and hold in position whilst the glue dries. Work your way in small sections until the toppings are glued all around the outer edges of the sole.
Note: My donor shoes had at least 1cm platform sole so it was easy to glue onto. If your sole is very thin you will have to either glue onto the lower edge of the shoe itself and trim, or otherwise you will have to fix the fabric on the bottom of the sole - (I personally don't like the idea of fixing the fabric onto the bottom of the soles because of the slip hazzard).
19. Trim off the excess material which is overhanging the edges of the soles. This completes the lower part of the boot topping.
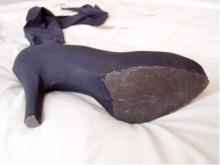
20. Try the new thighboots on for size. Finally turnover the tops and hem then at the desrired length.
Ta-Da! One nifty pair of thigh-high boots.

Cost = approx £4 of fabric + one pair donor shoes.
Hope you found this lil tutorial helpful. ^_^
Excellent stuff for those on a tight budget, here are his boots worn with the catsuit (the mask is still still a work-in-progress here)...


