I'd been mulling over the vertical spread eagle idea from http://www.likera.com/blog/wp/archives/1246 and how to improve the release mechanism and problems with getting into the position I'd had at previous attempts. Anyway, suffice to say I think I've come up with a neat solution which works well.
1. The frame
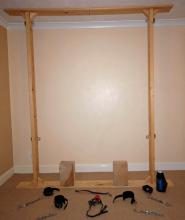
First I built a strong wooden frame (see pic 1) which was designed to fit tightly between ceiling and floor. I've used this before when first experimenting with this idea and it works fine. Basically two planks about 200x15mm and 3-4m long, one for the base (floor) and one for the upper cross piece (ceiling). Two uprights of about 100x50mm and just long enough to be hammered into place as a tight fit between the base on the floor and the upper cross piece on the ceiling. These are then kept in place using eight triangular corner wedges screwed into place.
 Pic 1
Pic 1
1. The release mechanism
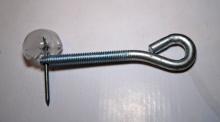
I wanted something simple and pretty foolproof as getting stuck isn't an option. Ice locks work well but not when subject to your whole body weight as it tends to shatter too easily unless you're hanging off a whole iceberg! So the ice lock has to hold something else that takes the strain and then releases when the ice melts. I decided that four M10 eyebolts would be the anchor points. I drilled a hole though the bolt end so that a metal pin (in this case a nail with the head sawed off) of smaller diameter than the drilled hole could hold the eye bolt in place in the wooden frame creating a solid anchor. The top of the pin can then be frozen in an ice cube such that it won't be able to drop through the hole in the bolt end of the eye bolt until the ice melts. Voila! (see pic 2).
 Pic 2
Pic 2
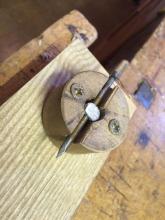
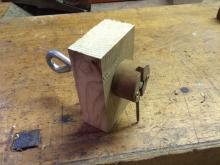
Ok, a few modifications are necessary. First you need a stand-off between the outside of the frame and the pin/ice cube arrangement so that you don't bend the pin or shatter the ice under your body weight. Second you need to delay the melting out of the pin a little. Metal conducts heat very well and so tends to melt out of the ice cube very quickly. You can remedy this by filing a slot around the head of the pin and tying a few cotton threads on to it. When frozen in the ice cube these don't conduct heat and although the pin might melt out quickly, the threads take longer adding extra time to the ice lock. The longer the thread, the longer the wait until release time. Experiment and do some dry (wet?) runs first and be aware that it depends on the temperature of the room also. I also noticed a tendency for the stand-off to rotate under load and top-heavy weight of the ice cube and so allow the pin to slip out when it rotates fully 180 degrees. I rectified this by cutting recessed slot in the stand-off for the pin to sit in and screwing the stand-off onto the outside of the frame (see example set up in pics 3 and 4 - minus ice cube). You can see in pic 4 that when vertical and with the ice lock melted the pin slips straight through; even under load a little wiggle of the anchor allows the pin to fall freely through and thereby release the eye bolt.
 Pic 3
Pic 3
 Pic 4
Pic 4
(hint: freeze your pins in the ice cubes supported by a simple piece of hardboard with a grid of holes drilled in it the same spacing as the recesses in your ice cube tray. I then take them carefully out... sitting the ice cube tray in some warm water helps... and always do more than you need as some can shatter as they are removed. I then placed them in a pre-cooled wide-mouthed drinks vacuum flask to keep frozen until needed).
3. Getting into position
The girl in the cartoon makes it look easy. It isn't! The blocks tend to wobble alarmingly and it is easy to fall and do yourself some damage as you balance precariously on these trying to attach ankle and then wrist chains to the eye bolt anchors. To reduce the wobble-factor I screwed a metal door hinge to the base of the blocks and then to the base of the frame. This provides a remarkable amount of extra stability while you mess with chains and anchors. A swift kick forwards is all that is needed to topple the blocks and you're hanging in a vertical suspended spread eagle position.
4. Ready?
I used double-ended triggers to attach the ankle chains to the lower eye bolt anchors and then padlocks to attach the wrist chains. This means you have to wait until the ice melts and the pins fall out. I did a dry run with triggers on the wrist chains as well to get chain lengths right and test the ice locks. I suggest you do too to make sure everything is the right length, height, load-bearing capacity, that the pins fall freely, that the ice melts... and you don't get stuck. It is a good idea to have a back up. Tie the padlock key to the end of a long piece of string and the other end to your wrist (it'll take you about as long to wind the string round and round your finger - bringing the key to your hand - as it does for the ice to melt).
5. Really ready?
OK here goes... Oops! Nearly forgot to dress accordingly! I decided on the black Libidex latex body with full sleeves, red latex shorts, lace-top hold ups, thigh length PVC boots with 4" heel, latex hood, a lockable slave collar, a mouth-filling "Kong" harness gag (see http://www.likera.com/forum/mybb/showthr...p?tid=1210) and my falsies! All in position? Right... kick! I do love the frisson of excitement as you get ready to kick the blocks away and the snap of the chains as they come taught. This session lasted ten minutes before the ice locks melted enough to let the pins drop... which was enough (I can feel my back and arm muscles aching as I type this some 5 hours later). Here are some pics for you...


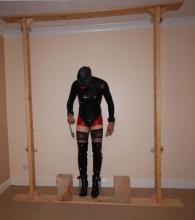


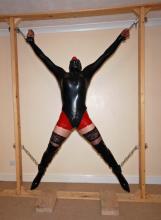
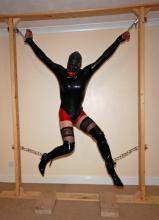

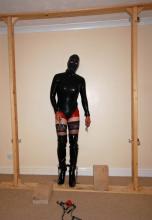
Have fun, play safe.
(This post was last modified: 15 Apr 2015, 08:08 by steve6322.)
1. The frame
First I built a strong wooden frame (see pic 1) which was designed to fit tightly between ceiling and floor. I've used this before when first experimenting with this idea and it works fine. Basically two planks about 200x15mm and 3-4m long, one for the base (floor) and one for the upper cross piece (ceiling). Two uprights of about 100x50mm and just long enough to be hammered into place as a tight fit between the base on the floor and the upper cross piece on the ceiling. These are then kept in place using eight triangular corner wedges screwed into place.
 Pic 1
Pic 11. The release mechanism
I wanted something simple and pretty foolproof as getting stuck isn't an option. Ice locks work well but not when subject to your whole body weight as it tends to shatter too easily unless you're hanging off a whole iceberg! So the ice lock has to hold something else that takes the strain and then releases when the ice melts. I decided that four M10 eyebolts would be the anchor points. I drilled a hole though the bolt end so that a metal pin (in this case a nail with the head sawed off) of smaller diameter than the drilled hole could hold the eye bolt in place in the wooden frame creating a solid anchor. The top of the pin can then be frozen in an ice cube such that it won't be able to drop through the hole in the bolt end of the eye bolt until the ice melts. Voila! (see pic 2).
 Pic 2
Pic 2Ok, a few modifications are necessary. First you need a stand-off between the outside of the frame and the pin/ice cube arrangement so that you don't bend the pin or shatter the ice under your body weight. Second you need to delay the melting out of the pin a little. Metal conducts heat very well and so tends to melt out of the ice cube very quickly. You can remedy this by filing a slot around the head of the pin and tying a few cotton threads on to it. When frozen in the ice cube these don't conduct heat and although the pin might melt out quickly, the threads take longer adding extra time to the ice lock. The longer the thread, the longer the wait until release time. Experiment and do some dry (wet?) runs first and be aware that it depends on the temperature of the room also. I also noticed a tendency for the stand-off to rotate under load and top-heavy weight of the ice cube and so allow the pin to slip out when it rotates fully 180 degrees. I rectified this by cutting recessed slot in the stand-off for the pin to sit in and screwing the stand-off onto the outside of the frame (see example set up in pics 3 and 4 - minus ice cube). You can see in pic 4 that when vertical and with the ice lock melted the pin slips straight through; even under load a little wiggle of the anchor allows the pin to fall freely through and thereby release the eye bolt.
 Pic 3
Pic 3 Pic 4
Pic 4(hint: freeze your pins in the ice cubes supported by a simple piece of hardboard with a grid of holes drilled in it the same spacing as the recesses in your ice cube tray. I then take them carefully out... sitting the ice cube tray in some warm water helps... and always do more than you need as some can shatter as they are removed. I then placed them in a pre-cooled wide-mouthed drinks vacuum flask to keep frozen until needed).
3. Getting into position
The girl in the cartoon makes it look easy. It isn't! The blocks tend to wobble alarmingly and it is easy to fall and do yourself some damage as you balance precariously on these trying to attach ankle and then wrist chains to the eye bolt anchors. To reduce the wobble-factor I screwed a metal door hinge to the base of the blocks and then to the base of the frame. This provides a remarkable amount of extra stability while you mess with chains and anchors. A swift kick forwards is all that is needed to topple the blocks and you're hanging in a vertical suspended spread eagle position.
4. Ready?
I used double-ended triggers to attach the ankle chains to the lower eye bolt anchors and then padlocks to attach the wrist chains. This means you have to wait until the ice melts and the pins fall out. I did a dry run with triggers on the wrist chains as well to get chain lengths right and test the ice locks. I suggest you do too to make sure everything is the right length, height, load-bearing capacity, that the pins fall freely, that the ice melts... and you don't get stuck. It is a good idea to have a back up. Tie the padlock key to the end of a long piece of string and the other end to your wrist (it'll take you about as long to wind the string round and round your finger - bringing the key to your hand - as it does for the ice to melt).
5. Really ready?
OK here goes... Oops! Nearly forgot to dress accordingly! I decided on the black Libidex latex body with full sleeves, red latex shorts, lace-top hold ups, thigh length PVC boots with 4" heel, latex hood, a lockable slave collar, a mouth-filling "Kong" harness gag (see http://www.likera.com/forum/mybb/showthr...p?tid=1210) and my falsies! All in position? Right... kick! I do love the frisson of excitement as you get ready to kick the blocks away and the snap of the chains as they come taught. This session lasted ten minutes before the ice locks melted enough to let the pins drop... which was enough (I can feel my back and arm muscles aching as I type this some 5 hours later). Here are some pics for you...


Have fun, play safe.


