
+- Like Ra's Naughty Forum (https://www.likera.com/forum/mybb)
+-- Forum: Self-Bondage (https://www.likera.com/forum/mybb/Forum-Self-Bondage)
+--- Forum: Self-Bondage Techniques (https://www.likera.com/forum/mybb/Forum-Self-Bondage-Techniques)
+--- Thread: Hands behind back - cross-tie with rope - with pictures (/Thread-Hands-behind-back-cross-tie-with-rope-with-pictures)
Hands behind back - cross-tie with rope - with pictures - Strappado - 11 May 2019
For quite a while, tieing my hands crossed behind my back is one of my favorite methods. This is a very interesting tie, as it is fairly easy to learn, feels pretty tight and - depending on a few details, you can either undo it with your fingers, need a door-handle or a similar hooking-device (door-knob won't work) or you have to cut the rope. And, if properly done, it will leave some rope marks for a while. It seems, that I haven't described this method, so here we go:
You need a rope of about 1 m length (a bit more than a yard). For starters, a stiffer type of rope might be nice, because it will be easier to undo the knots.
For safety, make sure, you have some sort of fixed hook (such as a door-handle), that you can slide between your wrist and the rope, preferably into a single coil of rope only.
And have a pair of safety scissors (the ones that are dull at the ends).
TIEING YOURSELF UP
Step 1
find the center of the rope, hold it with your left hand (if you are right-handed).
Grab the right strand with your right hand, about 20 cm below the center. Twist that strand clockwise while making a bight, put it on top of the center.
Hold this with your right hand now.
Grab the left strand with your left hand, about 20 cm below the center / crossed rope. Twist that strand clockwise (again) and put it on top of the other bight.
Take the rope at the ends of the bights and let it hang down.
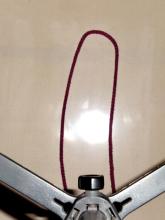
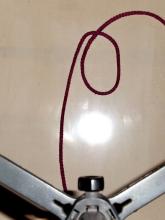
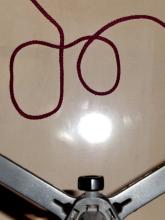
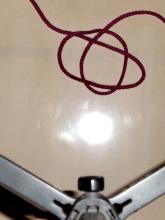
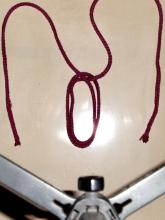
If you like to check, if you did it right:
Follow the right strand. It should come up to the right half of the bights, behind the other rope, then cross the other end, loop around clockwise, cross over itself, then under the other end, loop again, cross the first loop somewhere underneath, cross the first strand underneath, cross the other loop above, then dangle down on the left side (poo, hard to describe that in English) - well, look at the picture.
Step 2
Adjust both ends, so they have the same length. Then adjust the loops to a size, which allows you to put your hands through - one from each side.
I suggest, you practise with hands in front first... (what comes next, that is, the other part should be done in front of you anyway, why bother making it hard?
Now, put one hand through, then grab both open strands to make sure, you find them behind your back (still useful, if you do this in front of you). Put your other hand in the loops from the other side.

Grab one strand with each hand, as near as possible to the loops, and pull tight simultaneously. I never figured out, which strand should go in which hand, it makes a difference. It does not really matter though, one way, it tightens better. While this already feels like tied hands, it is not secure. With some wiggling, you can get your hands free again. Check, if both strands are still about the same length. This only matters, if the rope length is just right. With more length, this gets less important.

[SECURITY OPTION #1] Tie off with a simple overhand knot now - makes escape harder!
Step 3 - everything is done behind you, meaning, not in between hands and back, but really behind. If you are doing this in front for practise, you should actually perform the following actions between your hands and your belly. Actually, this is much easier, because it is the natural direction, in which your fingers will work.
With each hand, pick up the strand that this hand has previously pulled tight. It is the one, that slightly bends towards that hand.
Now wrap one strand around both wrists twice. Check in the mirror, if you aren't sure, this is very confusing at first, if you cannot see it.
Hold it fairly tight there.

Wrap the other strand around both wrists twice, but the other way around.

In the end, you should have the strand of rope in one hand, that comes from the wrist of the other hand, and vice versa.
While pulling on these ends, wiggle a bit, try to get rid of slack around your wrists.
[SECURITY OPTION #2] Only wrap each strand once, pull tight, then tie off with an overhand knot. This will make the door-handle-release ineffective.
Once you are happy with the tightness, tie off with an overhand knot. This is the moment, when you finally know, if your rope is really long enough.
The knot should be placed on the rope. This creates some friction which keeps the knot together, if you hold your hands still.

If you want it really tight, wiggle more, pull the ends etc. You will be astonished, how much slack you can create after a while, even if the initial tie feels really tight.
Feels secure already? Well, after a while, it will come lose and you will be able to get free.
Step 3 - point of no return (ish)
Now, prepare a second overhand knot, make sure, the first one is still tight, then close the second knot.

Security depends a lot on how you tighten the last knot. If you pull the ends slowly, no matter, how hard you pull, it will be undone fairly easy. Instead, if you yank really hard, it will get pretty tight.
[SECURITY OPTION #3] Use a longer rope and do as many knots as you please. If you get a "knot-rope", which is long enough, you can even make knots into that rope. This is a useful method for delayed freedom, if you are able to undo the knots with your fingers. If not, don't bother, because it won't resist other release methods.
RELEASE METHODS
The hardest option is to work the knots open with your fingers. It is definitely possible but might take some time. Very short fingernails make it harder. Very long ones might make it impossible, because they could break (I have no experience with that). Unless your fingers are too long, you can easily reach the knot, while it is located on the other wrist. With simultaneous rotation movements of both hands (back and forth obviously), you can move the knot a bit to get it into a better place. You can also grab the open strands to move the knot a bit.
The easiest way is to go to a door with a door-handle. Slide the door-handle into one of the loops, that you created by wrapping your wrists in step 2 and pull hard. This should create enough slack to get out one hand. Repeat, if necessary, and get rid of all loops from step 2. Now you have to wiggle a bit to losen the first two loops and you are free. once free, you can undo the knot and the rope is ready for the next session.
It is a bit harder (especially on the rope) to use scissors. Best cut next to the knot, because that leaves you with the longest possible remainder of rope. It also helps to find the right spot, in case you have to take a break. If one cut doesn't do the trick, keep cutting the same spot. Even with completely dull scissors, you will eventually make it. The rope will be too short to be used the same way again. So try to avoid using the scissors.
ADVANCED SECURITY OPTION
For this, you need a longer piece of rope. Proceed as before, make at least one overhand knot - the previous final knot is not really necessary. Then lead one strand over your forearms from behind towards your back, and one the other way. Then find out, where to place them to create the additional loop crosswise around your wrists. Tie off with two overhand knots. Now, you have one loop around your wrists, secured by two knots. This means, this knot stays where it is, probably somewhere on the inside of your wrists, where it is very hard to work on it. The door-handle release should still work. If you have tied off the original version with two knots, you have a bit more work or have to resort to cutting the rope.
I am going to post this now, then make photos and edit to add them. If you can understand, what I mean, before I have uploaded the photos, try right away 😉
OK, now with pictures. By the way, I am wearing the latex skater dress, that i got a few months ago.
A final note: This method is not exactly predictable. For the sake of getting it done, I just did it step by step, even though crossing the strands before wrapping them around my wrists (step 2) felt wrong. You can see on the image, why. I shold have switched the ends to the other hands. This is actually the first time, I see this process step by step, I only had a photo of the finished product. But predictability is more important concerning the quality of the knot. I am confident to get make a knot that I can undo. I do this, when I tie myself up inside a sleeping bag for example. Pulling the knot tight very gently always does the trick (so far - but that is part of the madness - release is still possible by destroying the bag). Often I just tie off randomly and see later, if I can undo that. I always have the door-handle... Yanking the knot tight hard often works - I need the door-handle to get free - but not always. Especially, when I am annoyed, I am pretty good at undoing knots. Same for the advanced security option: Sometimes I can undo the knot, sometimes I can't. This means, if I do two overhand knots at the end of step three, I need scissors.
RE: Hands behind back - cross-tie with rope - with pictures - Tinker D - 11 May 2019
Yes, we do need pictures.
RE: Hands behind back - cross-tie with rope - with pictures - Strappado - 11 May 2019
(11 May 2019, 21:39 )Tinker D Wrote: Yes, we do need pictures.
try now 😁
RE: Hands behind back - cross-tie with rope - with pictures - Strappado - 11 May 2019
Of course, this tie can be combined. If you use a much longer rope, you can either tie it to your body first, then tie off your hands, or even vice versa. In the second case, you need to be a bit creative about the lose ends...
If you like hogties, you can tie your legs first and have enough rope dangling from your hands to get it through your leg tie. Even better, have a piece of rope attached to your leg tie, pull it through your arms, then back through the leg tie (or a bight at the leg tie, if you cannot reach the tie itself). This will reduce pressure on the wrists and* make it easier to pull your feet up. You should tie this off with a type of knot, that you can open again with certainty, or make sure, you have a pair or scissors, where you can actually grab them. I am extremely careful, when doing hogties. I always do it in a way, that I can at least remove the tie between arms and legs without any problem. For two reasons by the way: A hog tie is quite immobilising and it can be quite hard to pick up anything from the ground, even if you are lying flat on the ground. The other reason is, that I sometimes get a cramp in a leg. In that case, the session must be changed, i.e. no hogtie at all, so I have to get lose real fast (I don't fancy pain).
* no, it won't, but it makes the pulling easier - principle of the pulley