art drawings photo fetish fashion bondage self-bondage bdsm pantyhose tights latex rubber swimsuits leotard high heels selfbondage
DIY chastity belt. Part I. Lockable
After playing with CB6000 and going through all related frustrations (see CB6000 and types of frustration), checking chastity belt reviews, visiting manufacturer sites, reading multiple forums, I decided to try to make a do-it-yourself chastity device with the following in mind:
comfortable for a long time wear
comfortable to wear even under tight clothes like pantyhose, swimsuits (cb6000 is a disaster)
impossible to pull off (one of the most common problem with commercial CB’s)
lockable
easy to make (I do not have much time for such “design projects”)
reliable (again, something what cb6000 is absolutely not)
cheap
At first sight absolutely unreal and incompatible conditions. However, as I said in “DIY/hadware vs sex-shops and some food for kinky thoughts. Part I“, pay a visit to the biggest hardware store in your area and spend there an hour or two. That may give you some interesting ideas.
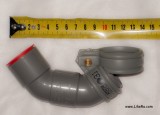
This is what I managed to make for €4 using a file, a screwdriver, a knife and pliers within about 1 hour.
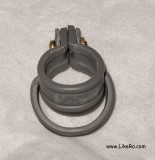
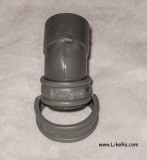
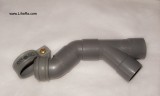
Only 4 items are needed: two clamps (different diameters, I used 40mm and 32mm) and two angled fittings (32mm). They can be found in the sewage department.
Remove the labels and check for sharp edges (also inside!). Use sand paper if needed.
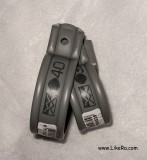
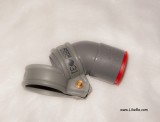
This is how two clamps should be connected.
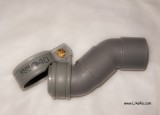
But in order to fix them in that position one of the clamps (I chose the biggest) needs to be “tweaked”. The closer you want to bring them together (the narrower the gap) the more you need to remove.
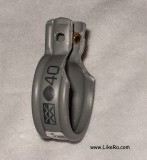
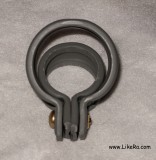
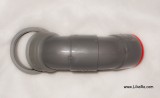
This is the result. Both clamps are connected with one screw.
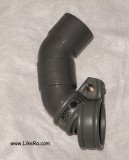
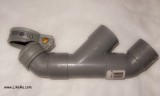
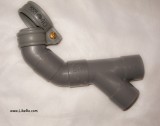
Release the screw a bot and insert the narrow part of the first fitting. Then tighten the screw again, so the fitting is tightly fixed in place. Check sizes in the shop. All sizes are standard.
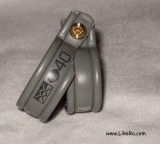
Add another fitting. Basically the chastity device is ready. It was not difficult, was it? You can try it on now. If the gap is too narrow to pull the testicles through it – release the screw, so the clamps can easily rotate around it. Usually I insert t
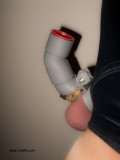
This is what it looks like under a swimsuit and pantyhose – just like a proper erection.
Nothing against the natural position.
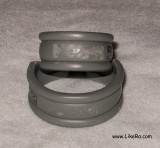
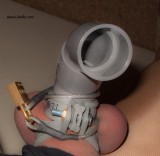
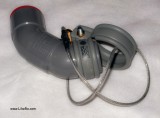
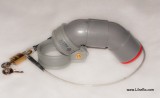
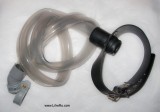
Next step is to make the chastity “belt” lockable. I threaded a DIY locking cable through the big clamp…
…criss-crossed it between testicles, tightened, wound around the tube an locked with a small padlock. The chastity device stayed firmly in place and without the key (or without too much pain) it was not possible to remove it. The mission completed.
The locked version. Still very neat, comfortable and not noticeable.
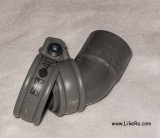
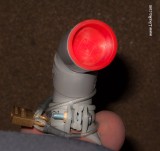
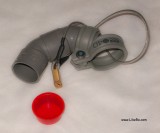
You can close the open end. Bought in the same department.
The construction can be improved, of course, but even the non-polished up version is pretty much usable.
If you want to restrict erection even more, you can use only one fitting with a cap.
Only your imagination is the limit here.
The details can be glued together.
One of the openings can be used to insert or mount a vibrator. Or vibrators (one inside one outside).
Why not to connect the chastity belt directly to a tube or a ring gag? Or, for example, to a butt plug? Or all three together? Add a vibrator drink a bit more liquid than usually, jump into self-bondage and enjoy 😉
If you are bound, it’s not necessary to make it lockable, you will not be able to remove it anyway. The “lockability” is optional and currently provided with a DIY steel cable. See DIY lockable clothes. Part I tutorial how to make one. To measure the length, find a piece of thick (to protect you thin skin from cutting) wire, and “lock” the belt with it, then measure the length. Do not forget to add some centimetres for the padlock “ears”.
If you still can pull out, add DIY cock rings, that will tighten the whole construction a little bit further.
If you need a more “hygienic version” for a long-term wear, drill holes in the tubes/fittings for easy washing/cleaning.
The basic (two clamps) construction can also be used for locking latex clothing with built-in condoms (see, for example, the DIY cock rings post).
Nana to Kaoru. Chapter 17. B, (D), S&M and sport See all chapters and related articles here. Another point. For some reason physical culture, physical education, physical training, or, simply...
Black sheer pantyhose. Part IV See all related posts. I hate shopping. The only thing what keeps me somehow interested is looking for pretty girls...
38 thoughts on “DIY chastity belt. Part I. Lockable”
Excellent and very clever!
Does the device remain comfortable if you are face-down on the floor/bed? I wondered if the plastic dug into your body at all?
Also could a smaller ‘clamp’ (the 32mm one) ‘lock’ the device in place when fitted around the base of your cock? (lock away the tools to undo the nut/screw and you’re just as stuck)?
I wondered if the plastic dug into your body at all?
Strangely enough – no, despite quite sharp ribs and edges (I did not spend any time on sanding at all 😉 ).
The most dangerous part in my opinion is the possibility for the clamps to fold down in a “scissor” like manner, but it depends on how much plastic you remove in the first step.
Actually my goal was to use this feature to clasp the device in place and then tighten the screw so it becomes unremovable without any locks. However it fits so tight so further “clasping” is practically impossible, hence I said that I cut too much PVC off.
“Tinker D ” wrote:
But I didn’t find any of the clamps you showed at my local hardware store.
Strange… They should be somewhere close to long PVC pipes used for sewage and to collect rain water.
Same problem here – I’ve searched through some comprehensive UK hardware catalogues and nothing at all like those clamps… 🙁
Oh LMAO!!! :DDD
Is the air still legal to use over there?!
Well, not really.
We have to lower our carbon footprint, so our Democrats want to issue everyone here to be allotted carbon points.
Something about an experiment for the UN government before it goes world-wide.
On the parts listed above, I check with every DIY and electrical shop around. and even plumbing shops. No dice on the clamps or even the other parts listed.
Yes, We have those all over the place. However, nothing that looks like the 35 and 40mm clamps you showed. All of ours are 1/2 rounded, and when you put two together, it looks egg-shaped.
Also, over here, the sewer pipe starts at 1.5 inch and goes to 2.0 inch. and we use hanging tape to suspend them under the house.
Я про тебя ващета. Что наш чел всегда и везде сделает няку из подножной каки. 🙂
Одно меня мучает: я не могу понять, КАК ты засунешь пиписку в 32-мм трубку?!
BTW, you can point it downward, backward, forward or sideward if you want – it’s all in your hands 😉 That’s the beauty of DIY and this particular design.
This is an amazing tip! It’s so arousing going through this immense diy store with only one thing in mind.
I made one myself after your model, I had to use 50mm for both clamps and the tubing, the 40mm was just too small to fit. I cut myself numerous times trying to get it to fit around the base and my cock just would not go in the 40mm tube even with a lot of lubrication.
The issue with same sizing all around is the fact that the clamps cannot fold as far as yours with the two different sizes.
I made a couple of improvements though and that is that I drilled out all holes of the clamps slightly so I can just stick a bolt through the whole piece and a nut on the other end. That works way easier and faster than the original screws.
The other thing I noticed is that if you tilt the top part, the cage if you will, up, your dick can get out (with difficulty, but still). I made a small cable between the bottom of the two clamps, preventing them from hinging out. Now my balls are nicely separated and it is a en extra locking device to prevent me from taking my dick out.
Again brilliant tip, thanks I’m gonna have a lot of fun with it 🙂
I made a small cable between the bottom of the two clamps, preventing them from hinging out. Now my balls are nicely separated and it is a en extra locking device to prevent me from taking my dick out.
Any photos? 😛
I’ll take some pics later this week. 🙂
This is it, you can see that I just drilled two small holes in the bottoms of the clamps and put a piece of string through it to A. prevent my dick from being pulled out and B. spreading my balls nicely left and right.
And also shown is the nut and bolt I use to easily clamp the whole thing together quick and easy.
Pictures are nog coming through, not via phone or pc.
Keep getting error message
Pictures are nog coming through, not via phone or pc.
Keep getting error message
What for error are you getting?
You can also try the forum.
Can you try again?
Much appreciated.
Seems like you could keep it on for a long time.
Will try it for the coming hols and post myself the keys.
Got a crap postal service where I live. Especially during national holiday. Send it registered. Then be forced to sign for them in public.
Rushed off this morning and got all the bits.
Fumbled a bit, hands shaky, but got it all on. Intend to keep it on a while, so pointed the hose down so I can pee. Don’t want to pee in my face. Trouble is I now need to sit to pee. I guess that now makes me a REAL SISSY.
Love how it separates the balls. Can’t keep them in my lacy panties, they keep popping out the sides. WHAT A SLUT.
Couldn’t be bothered to queue in the post office. Put the keys in an envelope and popped it into the nearest post box. Sent it to an erroneous address in a city 200 miles away, with my real address on the back as the sender. Hopefully I’ll get the envelope, AND KEYS, back sometime. Who knows when. What a rush, my fate in the hands of the Post Office. No crueler Mistress.
Made a slight adaption. Got a spare large black butt-plug around the house. Drilled a hole at the bottom, passed a screw through the last link in a short chain and screwed it securely into the bottom of the butt-plug. Poured crazy glue over the link and the plug, as well the head of the screw to make it impossible to use a screw driver on the assembly. The other end of the chain went round the inside of the larger ring and the attached to the chain again by a small nut and bolt. Lots of crazy glue again used to make it impossible to take off.
I would like to have made the plug permanent, but, a sissy has to go sometimes. But this way it’s always attached to the chastity device. Sure, you can take it out to do no.1, but you have to put it back in afterwards. At least until you get the KEY back from the cruel Mistress. I mean you can’t leave the butt-plug dangling between you legs when you go out, what would the neighbours say. That damn thing stays in for the duration too.
And what a turn on it is when you do walk down the street, waggling about in your insides. Even better on high heels, sashaying from side to side as you delicately place one toe before the other. A guaranteed stiffy.
And what a frigging turn on it was walking to the post box. Never been so hard. My only regret was having been so eager to get the damn thing on that I forgot to have quicky beat off before snapping the lock.
I sure hope I get that bloody key back. I can’t even see or touch my cock now. Under that armature even the power shower will be of no use.It’s so frustrating and am already so damn randy. Why did I do that for? I might never get that key back! Stupid Sissy Faggot.
I can reach inside my trousers and rub my balls as they stick out the side of the panties. Even tug on the chain attached to my bulky plug. But that’s your lot.
I’m regretting this already. I’m sure I’ll have trouble sleeping tonight. I’ll need my pink frilly nightie to calm me down tonight.
That damn postie better get a move on.
Excellent, looks soo hot. What an inspiration! Finally found a way to upload my pics on this
Attachment:
From the front, no scissoring effect with this construction. Tube is 40mm, clamp is 50mm
You’re welcome :-). I got some other ideas on this as well, creating a more comfortable way to close off the end, the red cap traps some skin sometimes, which is painful. The red cap is pointed inwards, taking up almost an inch of the inside space. I could shorten the whole thing by using a screw on end-cap that sits on the edge rather than pushed vacuum inwards. I’ll be sure to upload other versions.
P.S. fyi, the fact that pictures weren’t uploading is because the extension has to be exactly .jpg nót .jpeg (my phone gives them the extension .jpeg).
You might also want to check the forum, and upload the pictures there.
 After playing with CB6000 and going through all related frustrations (see CB6000 and types of frustration), checking chastity belt reviews, visiting manufacturer sites, reading multiple forums, I decided to try to make a do-it-yourself chastity device with the following in mind:
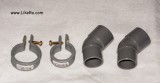


Excellent and very clever!
Does the device remain comfortable if you are face-down on the floor/bed? I wondered if the plastic dug into your body at all?
Also could a smaller ‘clamp’ (the 32mm one) ‘lock’ the device in place when fitted around the base of your cock? (lock away the tools to undo the nut/screw and you’re just as stuck)?
Love it anyway 🙂
MJ
“Madjack ” wrote:
As far as I remember I tried that and it was OK.
“Madjack ” wrote:
Strangely enough – no, despite quite sharp ribs and edges (I did not spend any time on sanding at all 😉 ).
The most dangerous part in my opinion is the possibility for the clamps to fold down in a “scissor” like manner, but it depends on how much plastic you remove in the first step.
Actually my goal was to use this feature to clasp the device in place and then tighten the screw so it becomes unremovable without any locks. However it fits so tight so further “clasping” is practically impossible, hence I said that I cut too much PVC off.
“Madjack ” wrote:
Depends on the size of the base, right? Entirely possible. The problem will be in connecting the clamps together. Probably more “cutting” is needed.
“Madjack ” wrote:
Or if you’re away with no tools 😉
What a fantastic design. And cheap too. I love it.
But I didn’t find any of the clamps you showned at my local hardware store.
But I will keem my eyes open for them.
“Tinker D ” wrote:
Strange… They should be somewhere close to long PVC pipes used for sewage and to collect rain water.
“Like Ra ” wrote:
Same problem here – I’ve searched through some comprehensive UK hardware catalogues and nothing at all like those clamps… 🙁
MJ
“Madjack ” wrote:
What about real off-line shops? (The bigger, the better, of course)
Updated the post: added more possible versions or additions.
Strange law in the USA.
>Strange… They should be somewhere close to long PVC pipes used for sewage and to collect rain water.<
Rain water is a national resource, and is now ileagl to collect and store.
But maybe we can find them in a German on-line hardware store.
Наш человек.
😀
“Tinker D ” wrote:
Oh LMAO!!! :DDD
Is the air still legal to use over there?!
Well, not really.
We have to lower our carbon footprint, so our Democrats want to issue everyone here to be allotted carbon points.
Something about an experiment for the UN government before it goes world-wide.
On the parts listed above, I check with every DIY and electrical shop around. and even plumbing shops. No dice on the clamps or even the other parts listed.
“Billy ” wrote:
У них тоже выборы 😀
“Tinker D ” wrote:
Electrical shops – definitely no. Plumbing shops – yes, very close.
“Tinker D ” wrote:
You should have something similar, for example:
http://www.usplastic.com/catalog/default.aspx?catid=732&parentcatid=731
Yes, We have those all over the place. However, nothing that looks like the 35 and 40mm clamps you showed. All of ours are 1/2 rounded, and when you put two together, it looks egg-shaped.
Also, over here, the sewer pipe starts at 1.5 inch and goes to 2.0 inch. and we use hanging tape to suspend them under the house.
But, I’ll keep looking
“Like Ra ” wrote:
Я про тебя ващета. Что наш чел всегда и везде сделает няку из подножной каки. 🙂
Одно меня мучает: я не могу понять, КАК ты засунешь пиписку в 32-мм трубку?!
“Billy ” wrote:
А, блин… 😀
“Billy ” wrote:
Grower vs shower. 🙂 Все коммерческие девайсы тоже очень узкие и короткие.
“Tinker D ” wrote:
Yes, I’ve seen such things. Was thinking about them as well, but finally came up with this clamps design.
“Tinker D ” wrote:
Tape???? Nah… No way….
Yes way. Called plumers tape. Made of steel about an inch wide and has holes every 1/2 inch or so. Comes in a 10 foot roll.
tried to send picture. no luck
“Tinker D ” wrote:
That’s another story. I thought about something like plumbers sticky tape.
Yea, I saw that too.
Plumers tape for coating pipe threads is plastic.
Plumers Tape for hanging pipe is steel with nail holes.
So one question- why does it direct upward instead of downward?
“603 ” wrote:
It feels much more comfortable, especially in tight clothes.
“603 ” wrote:
BTW, you can point it downward, backward, forward or sideward if you want – it’s all in your hands 😉 That’s the beauty of DIY and this particular design.
This is an amazing tip! It’s so arousing going through this immense diy store with only one thing in mind.
I made one myself after your model, I had to use 50mm for both clamps and the tubing, the 40mm was just too small to fit. I cut myself numerous times trying to get it to fit around the base and my cock just would not go in the 40mm tube even with a lot of lubrication.
The issue with same sizing all around is the fact that the clamps cannot fold as far as yours with the two different sizes.
I made a couple of improvements though and that is that I drilled out all holes of the clamps slightly so I can just stick a bolt through the whole piece and a nut on the other end. That works way easier and faster than the original screws.
The other thing I noticed is that if you tilt the top part, the cage if you will, up, your dick can get out (with difficulty, but still). I made a small cable between the bottom of the two clamps, preventing them from hinging out. Now my balls are nicely separated and it is a en extra locking device to prevent me from taking my dick out.
Again brilliant tip, thanks I’m gonna have a lot of fun with it 🙂
“Tom ” wrote:
Any photos? 😛
I’ll take some pics later this week. 🙂
This is it, you can see that I just drilled two small holes in the bottoms of the clamps and put a piece of string through it to A. prevent my dick from being pulled out and B. spreading my balls nicely left and right.
And also shown is the nut and bolt I use to easily clamp the whole thing together quick and easy.
Pictures are nog coming through, not via phone or pc.
Keep getting error message
“Tom ” wrote:
What for error are you getting?
You can also try the forum.
Can you try again?
Much appreciated.
Seems like you could keep it on for a long time.
Will try it for the coming hols and post myself the keys.
Got a crap postal service where I live. Especially during national holiday. Send it registered. Then be forced to sign for them in public.
Rushed off this morning and got all the bits.
Fumbled a bit, hands shaky, but got it all on. Intend to keep it on a while, so pointed the hose down so I can pee. Don’t want to pee in my face. Trouble is I now need to sit to pee. I guess that now makes me a REAL SISSY.
Love how it separates the balls. Can’t keep them in my lacy panties, they keep popping out the sides. WHAT A SLUT.
Couldn’t be bothered to queue in the post office. Put the keys in an envelope and popped it into the nearest post box. Sent it to an erroneous address in a city 200 miles away, with my real address on the back as the sender. Hopefully I’ll get the envelope, AND KEYS, back sometime. Who knows when. What a rush, my fate in the hands of the Post Office. No crueler Mistress.
Made a slight adaption. Got a spare large black butt-plug around the house. Drilled a hole at the bottom, passed a screw through the last link in a short chain and screwed it securely into the bottom of the butt-plug. Poured crazy glue over the link and the plug, as well the head of the screw to make it impossible to use a screw driver on the assembly. The other end of the chain went round the inside of the larger ring and the attached to the chain again by a small nut and bolt. Lots of crazy glue again used to make it impossible to take off.
I would like to have made the plug permanent, but, a sissy has to go sometimes. But this way it’s always attached to the chastity device. Sure, you can take it out to do no.1, but you have to put it back in afterwards. At least until you get the KEY back from the cruel Mistress. I mean you can’t leave the butt-plug dangling between you legs when you go out, what would the neighbours say. That damn thing stays in for the duration too.
And what a turn on it is when you do walk down the street, waggling about in your insides. Even better on high heels, sashaying from side to side as you delicately place one toe before the other. A guaranteed stiffy.
And what a frigging turn on it was walking to the post box. Never been so hard. My only regret was having been so eager to get the damn thing on that I forgot to have quicky beat off before snapping the lock.
I sure hope I get that bloody key back. I can’t even see or touch my cock now. Under that armature even the power shower will be of no use.It’s so frustrating and am already so damn randy. Why did I do that for? I might never get that key back! Stupid Sissy Faggot.
I can reach inside my trousers and rub my balls as they stick out the side of the panties. Even tug on the chain attached to my bulky plug. But that’s your lot.
I’m regretting this already. I’m sure I’ll have trouble sleeping tonight. I’ll need my pink frilly nightie to calm me down tonight.
That damn postie better get a move on.
Excellent, looks soo hot. What an inspiration! Finally found a way to upload my pics on this
Attachment: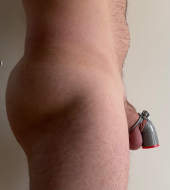
From the front, no scissoring effect with this construction. Tube is 40mm, clamp is 50mm
Attachment: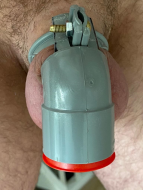
“Anonymous ” wrote:
Excellent solution! Thanks much for sharing!
You’re welcome :-). I got some other ideas on this as well, creating a more comfortable way to close off the end, the red cap traps some skin sometimes, which is painful. The red cap is pointed inwards, taking up almost an inch of the inside space. I could shorten the whole thing by using a screw on end-cap that sits on the edge rather than pushed vacuum inwards. I’ll be sure to upload other versions.
P.S. fyi, the fact that pictures weren’t uploading is because the extension has to be exactly .jpg nót .jpeg (my phone gives them the extension .jpeg).
You might also want to check the forum, and upload the pictures there.